
Working with Modules
Modules are the building blocks of every SynthEdit project. Each module performs a specific function — generating sound, processing audio, handling MIDI, or providing user interface controls.
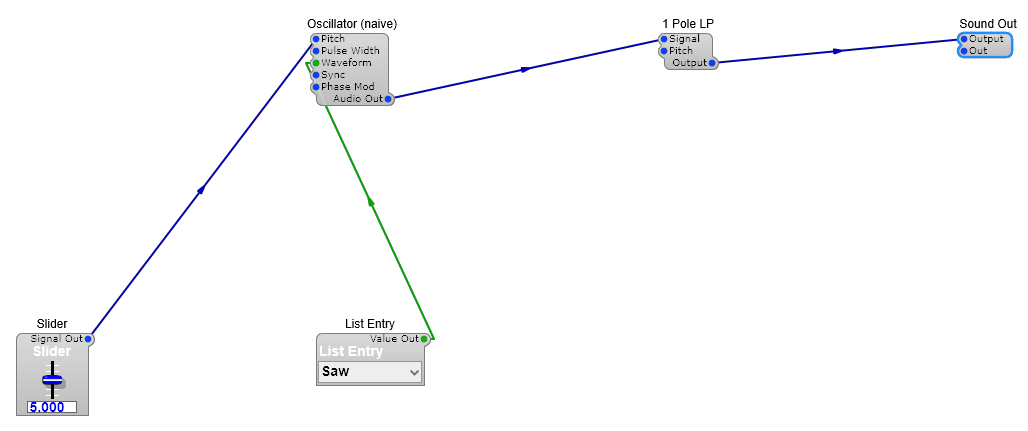
Each module shows its pins as coloured labels — inputs on the left, outputs on the right. The colour of the cable matches the signal type: blue is audio, green is a list (enum) value, yellow is MIDI.
Inserting Modules
Section titled “Inserting Modules”Every module comes from the Module Browser, the panel down the left-hand side of the window (toggle it with View → Module Browser if it’s hidden). It has a search box at the top and a category tree (Oscillators, Filters, Effects, and so on) below it. Adding a module takes two clicks: click its name in the list, then click an empty spot in the Structure View to place it.
See Your First Synth for a walkthrough.
Connecting Modules
Section titled “Connecting Modules”To connect two modules, click on an output pin (right side) and drag to an input pin (left side) on another module. A cable appears showing the connection.
Cable colour indicates signal type — see Signal Types & Levels for the full list. You can only connect pins of compatible types.
Module Properties
Section titled “Module Properties”Click on a module to select it, then view its properties in the properties panel. Common properties include:
- Name — rename the module for clarity
- Default values — set initial values for unconnected inputs
Containers have their own additional properties, including Polyphony — see Containers & Prefabs.
Organizing Your Canvas
Section titled “Organizing Your Canvas”- Move modules by dragging them
- Select multiple by drawing a selection rectangle
- Group modules into containers for organization
- Add notes to document your patch
Next Steps
Section titled “Next Steps”- Learn about Creating VST Plugins to export your work