Distributing plugins with GitHub Actions
Once your synth or effect is finished, the last mile is shipping it: exporting the plugin, wrapping it in an installer for each platform, and putting it somewhere people can download. Doing that by hand — on both Windows and a Mac — is tedious and easy to get wrong.
This tutorial wires up GitHub Actions to do all of it automatically. When you push a version tag, GitHub will:
git tag v1.0.0 ─► GitHub Actions ├─ Windows runner ─► export Poly Synth.vst3 ─► Inno Setup ─► PolySynth-1.0.0-Windows.exe ├─ macOS runner ─► export .vst3 + .component ─► pkgbuild ─► PolySynth-1.0.0-macOS.pkg └─ release job ───► GitHub Release ◄── both installers attachedYou don’t need your own build server, and you don’t even need a Mac — GitHub provides both runners. The whole thing is driven by one workflow file.
Everything below is a working, public example you can fork: github.com/JeffMcClintock/poly-synth-plugin.
Writing your own C++ modules rather than exporting a finished project? See Building modules with GitHub Actions.
What you’ll need
Section titled “What you’ll need”- A free GitHub account.
- A finished SynthEdit project. We use
poly_synth.synthedit, a two‑oscillator polyphonic synth, but any project works. - That’s it. The build machines, SynthEdit installs, and installer tools all live in the cloud.
How the example is laid out
Section titled “How the example is laid out”poly-synth-plugin/├─ poly_synth.synthedit ← your synth├─ .github/workflows/build-plugin.yml ← the pipeline├─ installer/│ ├─ windows/poly_synth.iss ← Inno Setup script│ └─ macos/build-pkg.sh ← pkgbuild script└─ assets/license.txt ← shown on the installer's license pageStep 1 — Give your plugin a stable identity
Section titled “Step 1 — Give your plugin a stable identity”Before a project can be exported as a plugin it must be wrapped in a single container, and that plugin needs an identity: a name, a developer name, and a unique VST3 ID. In the example, the whole synth lives inside one container (“Synth”) that the host sees as the plugin:

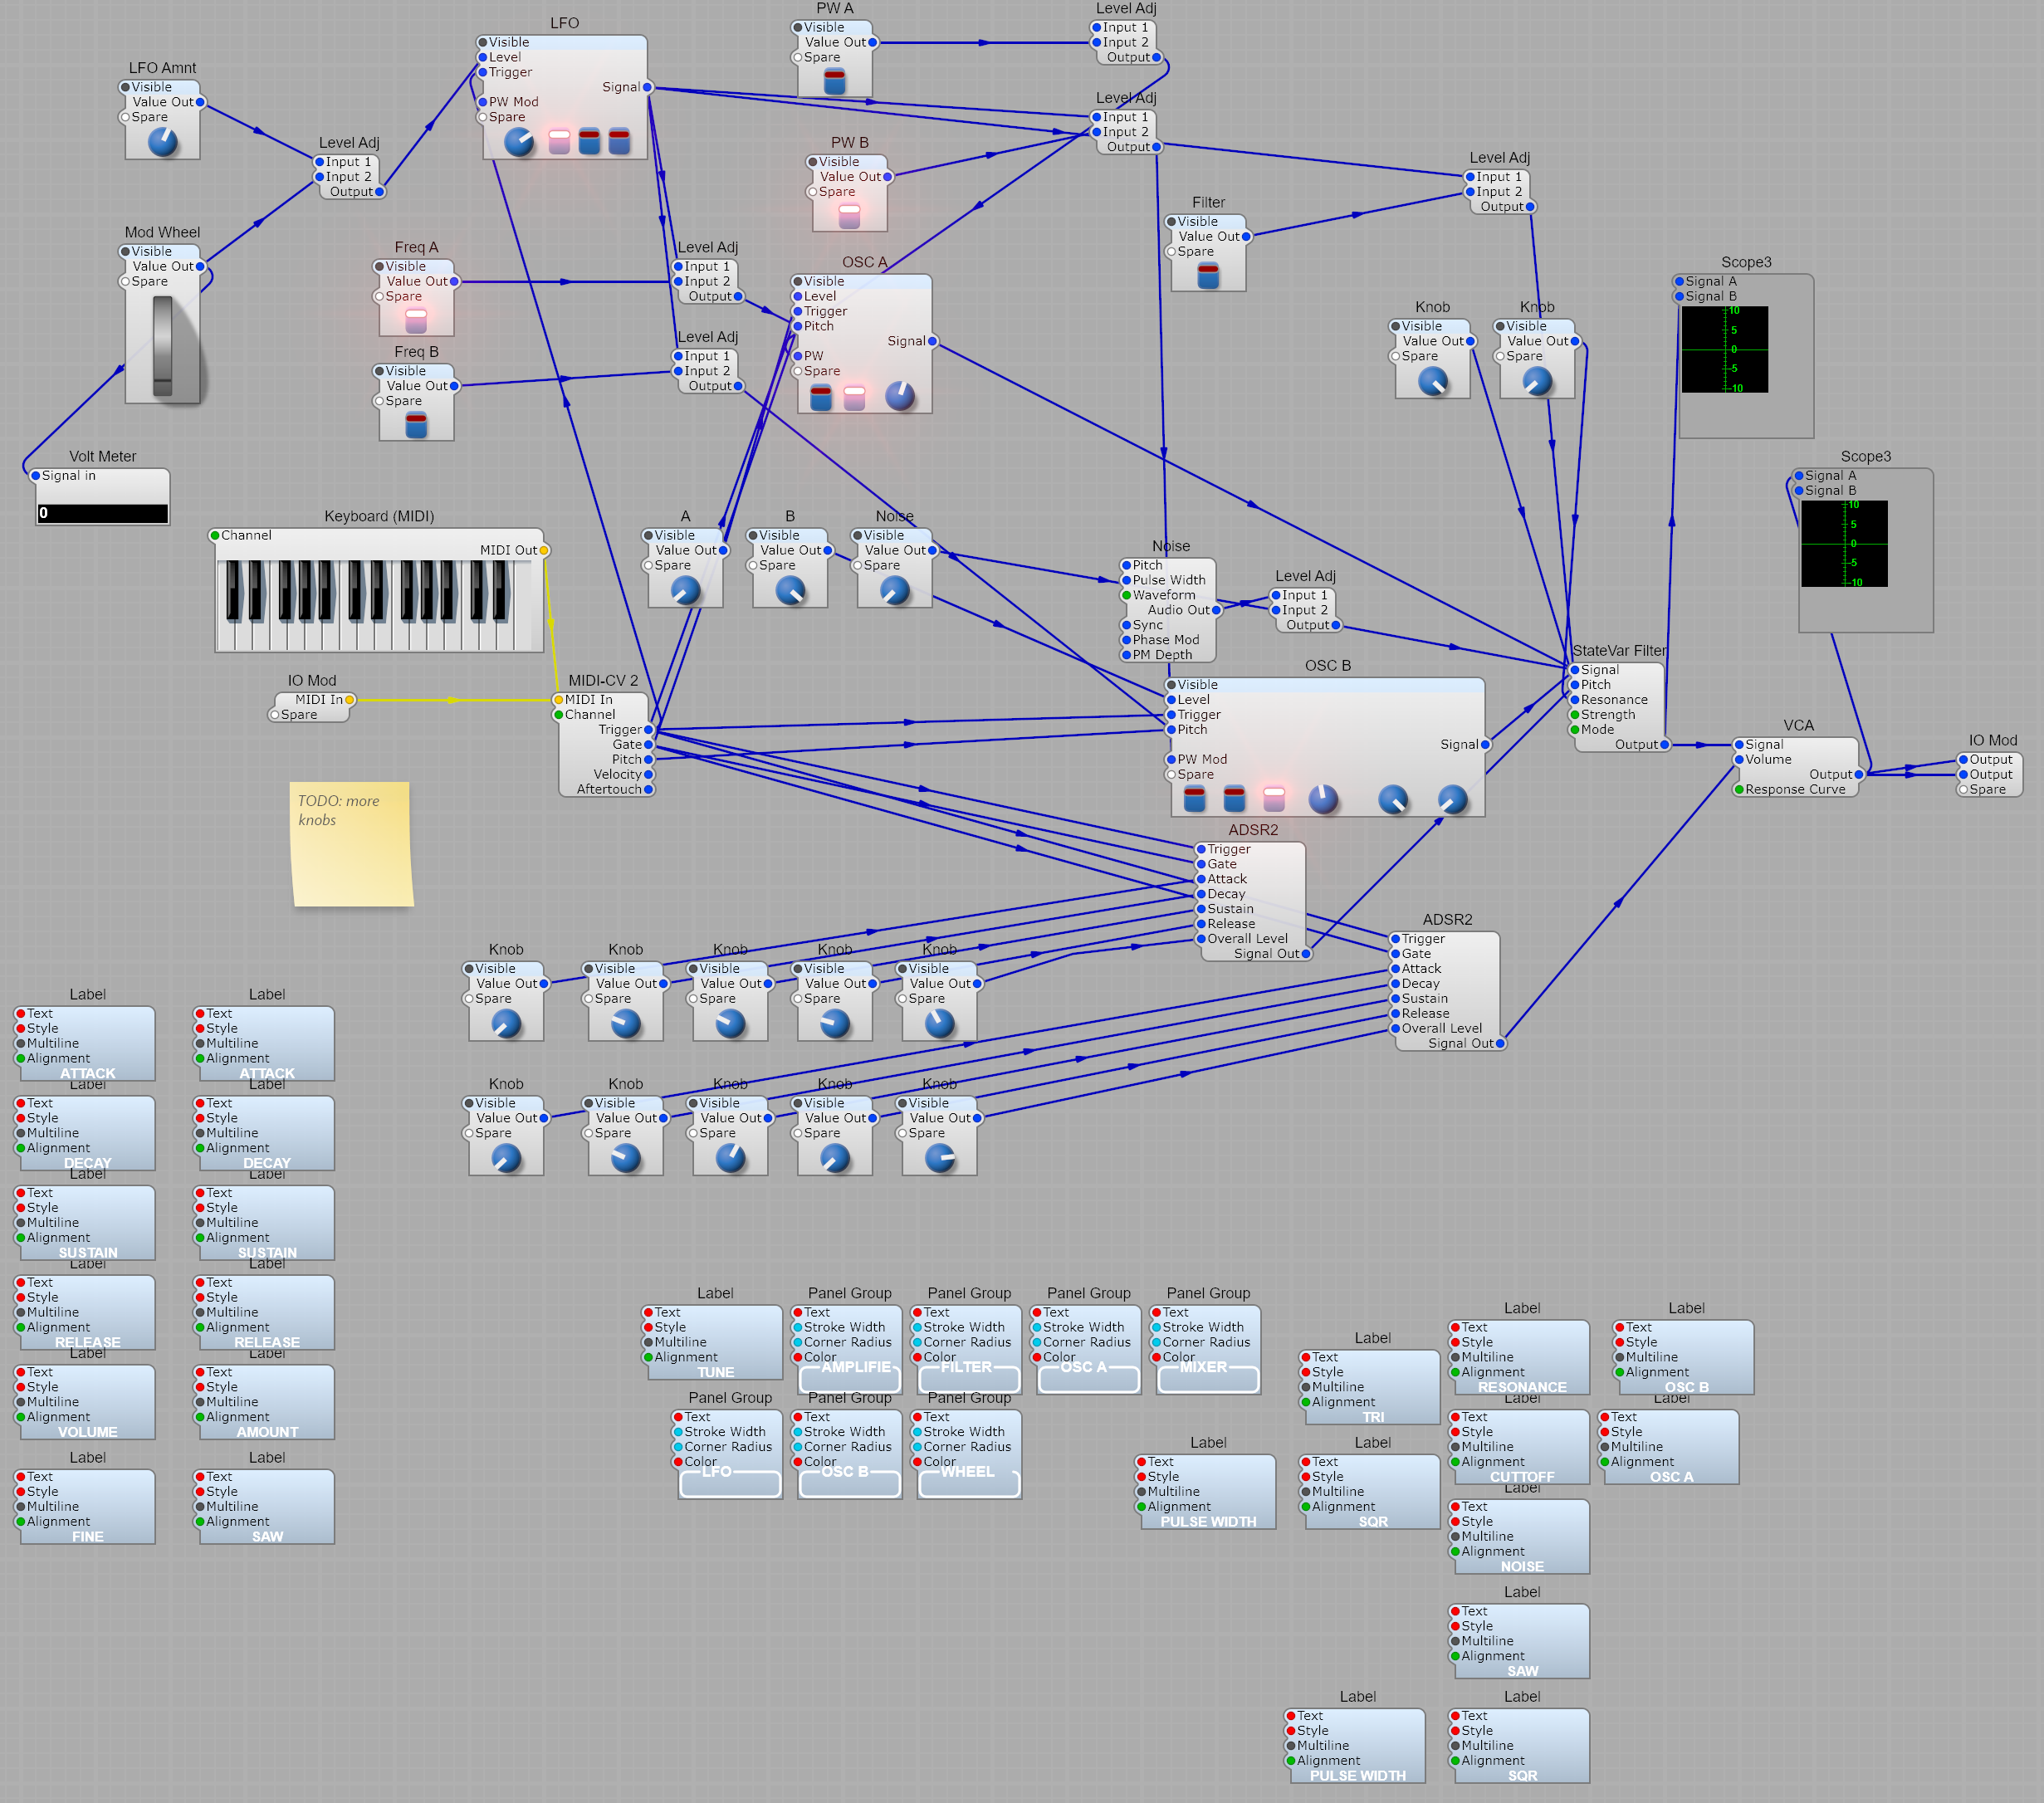
Inside that container is the actual synth — two oscillators, a filter, envelopes, an LFO and mod‑wheel routing:
The identity is set once, in SynthEdit, and saved into the project. The important fields are the plugin name, the developer name, and the VST3 ID (SynthEdit can generate the ID for you). See Creating VST Plugins for where these live. Pinning them in the project matters: it means every automated build produces a plugin with the same identity, so updates replace the old version in a user’s DAW instead of showing up as a duplicate.
Why this matters for CI — when these fields are empty, SynthEdit invents an identity at export time, which would differ on every build. Set them once and commit the project.
Step 2 — How the plugin gets exported
Section titled “Step 2 — How the plugin gets exported”The key trick is that the normal, public SynthEdit can export a plugin from the command
line, with no GUI — the same Export the editor’s menu uses. The workflow installs
SynthEdit on the runner and then runs it headless.
On macOS it’s a one‑liner:
SynthEdit "poly_synth.synthedit" -rescan -autosavevst -quietThat writes both the VST3 (Poly Synth.vst3) and the Audio Unit (Poly Synth.component)
into your plugin folders.
On Windows, the workflow uses SynthEditCL — the headless, command‑line build of SynthEdit. It’s a plain console tool, so it exports and exits cleanly:
SynthEditCL "poly_synth.synthedit" -rescan -autosavevst3 -quietOne wrinkle: the VST3 export templates ship inside the full SynthEdit download rather
than the CL one. The workflow gets them by unpacking the SynthEdit installer and copying
the templates next to SynthEditCL — so it never has to register the MSIX app on the
runner.
A SynthEdit .vst3 is a bundle — a folder, not a single file — and it’s
self‑contained: the DSP modules your patch uses are copied inside it. That’s why the
installers don’t have to ship anything else.
Poly Synth.vst3/└─ Contents/ ├─ x86_64-win/Poly Synth.vst3 ← Windows binary ├─ MacOS/Poly Synth.vst3 ← macOS binary ├─ PlugIns/ ← the factory modules the patch uses └─ Resources/ ← GUI, parameters, skinHeads up — on Windows, SynthEdit writes the bundle to
C:\Program Files\Common Files\VST3and aborts if that folder doesn’t exist, so the workflow creates it first.
Step 3 — Wrapping it in an installer
Section titled “Step 3 — Wrapping it in an installer”A plugin folder isn’t something you hand to a user — they expect an installer that puts it in the right place.
Windows uses Inno Setup (pre‑installed on GitHub’s
Windows runners). The whole bundle folder is recursed into Common Files\VST3:
[Setup]DefaultDirName={commoncf}\VST3\Poly Synth.vst3...[Files]Source: "..\..\build\Poly Synth.vst3\*"; DestDir: "{app}"; \ Flags: ignoreversion recursesubdirs createallsubdirsmacOS uses pkgbuild to make a .pkg that installs the .vst3 and .component into
/Library/Audio/Plug-Ins:
pkgbuild --root build/pkgroot --install-location / \ --identifier com.example.polysynth --version "$VERSION" \ "PolySynth-$VERSION-macOS.pkg"Step 4 — The workflow
Section titled “Step 4 — The workflow”Everything is tied together by
.github/workflows/build-plugin.yml.
It triggers on any tag that starts with v, plus a manual button for test runs:
on: push: tags: ['v*'] workflow_dispatch:It has three jobs:
windows(runs onwindows-latest) — installs SynthEdit, exports the VST3, and builds the.exeinstaller.macos(runs onmacos-15) — installs SynthEdit from the DMG, exports the VST3 + AU, and builds the.pkg.release— waits for both, then attaches the two installers to a GitHub Release. It uses the built‑inGITHUB_TOKEN, so there are no secrets to configure:
release: needs: [windows, macos] if: github.ref_type == 'tag' runs-on: ubuntu-latest permissions: contents: write steps: - uses: actions/download-artifact@v4 with: { path: dist } - uses: softprops/action-gh-release@v2 with: files: | dist/windows-installer/* dist/macos-installer/* generate_release_notes: trueStep 5 — Ship a release
Section titled “Step 5 — Ship a release”With the workflow in your repo, releasing is two commands:
git tag v1.0.0git push origin v1.0.0Open the Actions tab and watch the three jobs run: Windows and macOS build in
parallel, then Publish GitHub Release collects their installers. The whole thing takes
about a minute.
When it finishes, your installers are on the Releases page, ready to download. You can
see a real run of exactly this on the example repo:
its v0.1.0 release
carries PolySynth-…-Windows.exe and PolySynth-…-macOS.pkg, built start‑to‑finish by the
Actions run above.
To rehearse without publishing, use Actions → Build & Release Poly Synth → Run workflow — that runs the two build jobs and skips the release.
Installing the result
Section titled “Installing the result”Because these installers are unsigned, the OS will warn the first time:
- Windows — SmartScreen shows “Windows protected your PC”. Click More info → Run anyway.
- macOS — Gatekeeper blocks an unsigned
.pkg. Right‑click the.pkg→ Open, or runxattr -dr com.apple.quarantine PolySynth-1.0.0-macOS.pkgfirst.
Then load Poly Synth in any VST3 host (or AU on macOS) and play.
Going further
Section titled “Going further”- Code signing removes those warnings. On Windows, sign the installer with
Azure Trusted Signing or a
standard code‑signing certificate; on macOS, sign with a Developer ID certificate and
notarize the
.pkgwithnotarytool. Both slot into the workflow as extra steps and a few repo secrets. - Presets — ship a folder of
.vstpresetfiles alongside the plugin. - A custom GUI — design your panel in SynthEdit; it’s baked into the same
.vst3. - Versioning — the tag is the version.
git tag v1.1.0ships 1.1.0.
Fork the example and push your first tag: github.com/JeffMcClintock/poly-synth-plugin.