SynthEdit ships with hundreds of built-in modules, and the community provides hundreds more — but sometimes you need behaviour nothing else gives you: an unusual filter topology, a third-party DSP library wrapper, a bespoke control widget. The SEM v3 SDK lets you build those modules in C++ and drop them straight into the editor alongside the factory library.
Modules you write with the SDK are first-class. They appear in the Insert Module browser, they wire into patches with cables, they get exported into VST3 plugins like any other module, and you can sell or freely distribute the plugins that use them.
No combination of built-in modules does what you need — e.g. a specific oscillator algorithm, a proprietary DSP technique, a model-based filter.
You need to wrap an existing C/C++ library — convolution engines, neural network inference, third-party reverbs.
You want a custom GUI widget — a waveform display, an XY pad with non-trivial drawing, a meter with a particular ballistic.
Performance matters and a container of small modules is too slow — a hand-rolled SEM avoids the per-module overhead.
If you can build it from existing modules and a container, do that first — it’s faster to iterate and works without recompiling. The SDK is for the cases where containers run out of road.
A C++ compiler. Visual Studio 2015 through 2022 on Windows (Community edition is fine), Xcode on macOS, or GCC. The SDK ships solution files for Visual Studio and an Xcode workspace for Mac.
CMake and Git — the Build Code Skeleton workflow below builds with CMake, which also covers cross-platform builds and the cloud build service.
A licensed copy of SynthEdit installed locally — you’ll be loading your module into it constantly while developing.
Working C++ knowledge. The SDK is small and clean, but it’s still C++ — pointers, headers, templates, the usual.
You do not need to compile SynthEdit itself. The SDK is a separate repo that links against headers and produces standalone .sem files (Windows) or .bundle files (Mac) that SynthEdit loads at startup.
The repo contains the headers (se_sdk3/), a large library of example modules with full source, Visual Studio solution files, an Xcode workspace, and CMakeLists.txt for CMake builds. It uses a BSD-style license — you can redistribute it, ship it inside commercial plugins, and modify it freely.
If you’d rather grab a snapshot zip than clone, the SDK page on synthedit.com has se_sdk.zip (latest) and se_sdk_stable.zip (last known-good release).
The DSP side — runs on the audio thread, processes samples and events block-by-block.
The GUI side — runs on the UI thread, draws the module’s panel face and handles mouse and keyboard input.
They live in the same binary but communicate through parameters (the recommended path) or low-level message pipes (for unusual cases). Parameters are automatically saved with the project, exposed to the host DAW for automation, and routed across the DSP/GUI boundary by the framework.
Each module also has a small XML definition describing it — its unique ID, display name, category, pin list, whether it’s polyphonic, what graphics API its GUI uses. The XML is parsed by SynthEdit at load time so the module appears in the Insert Module browser without recompiling SynthEdit itself.
Pins are typed. The SDK supports float, int, bool, text, enum, blob and midi pin types, each with input or output direction, and each running at either audio rate (one value per sample, streaming) or event rate (a value when it changes). Audio cables in the editor map to streaming float pins; the green “list” cables map to enum pins; the yellow MIDI cables map to midi pins.
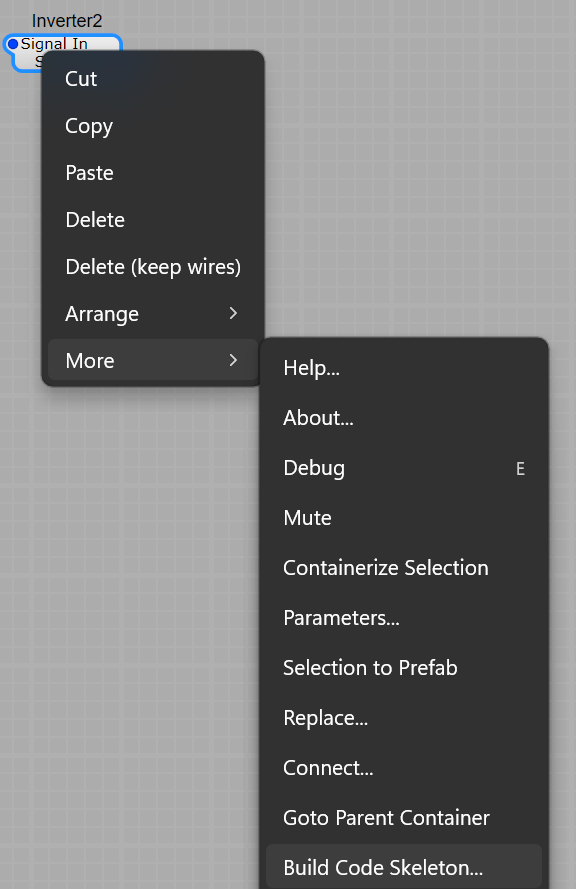
Rather than write XML and C++ from scratch, let SynthEdit do it for you:
In the editor, right-click the existing module that most resembles what you want to build — the skeleton copies its pin list, so right-clicking an Inverter gives you a one-audio-in, one-audio-out starter ready to repurpose.
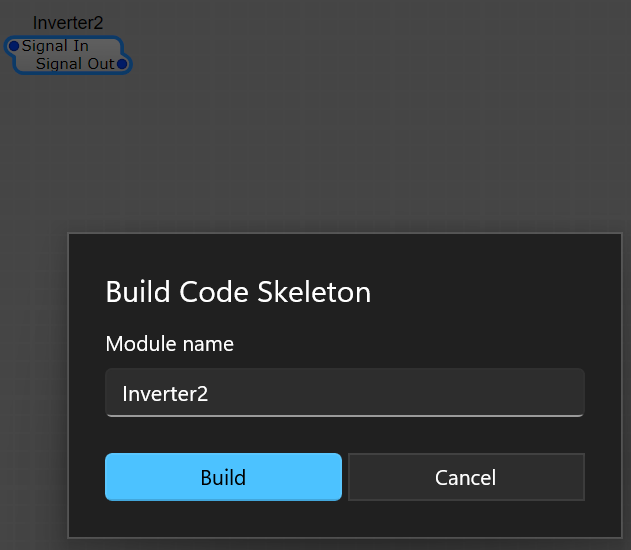
Pick More → Build Code Skeleton…
Type a name for your module and click Build.
SynthEdit writes a starter project into Documents\new_module\ and opens the folder. For a module named Inverter2 it looks like this:
Documents\new_module\
│ CMakeLists.txt ← master build recipe — point CMake at THIS folder
│
└───Inverter2\
CMakeLists.txt ← the module's own file list (not buildable by itself)
Inverter2.cpp ← pins, processing loop, and module XML, ready to edit
Inverter2.htm ← the module's help page
(GUI modules also get an Inverter2Gui.cpp.) The .cpp already compiles and already declares the same pins as the module you right-clicked. From here, development is: rename pins, add pins, fill in the processing loop, rebuild.
The skeleton builds with CMake, so here’s the one-paragraph version. CMake is not a compiler and not an IDE — it’s a project generator. It reads a recipe file named CMakeLists.txt and writes out a normal Visual Studio solution (or Xcode project on Mac) with all the SDK paths, compiler settings, and source files filled in. You run CMake once; after that you work in Visual Studio as usual.
Git — git-scm.com (CMake uses it behind the scenes)
An internet connection for the first run — the recipe downloads the SynthEdit and GMPI SDKs from GitHub automatically. For this workflow you don’t need to clone or install any SDK by hand.
Point CMake at the parent folder — not the module’s folder
The skeleton contains twoCMakeLists.txt files, and mixing them up is the most common reason a first build fails:
new_module\CMakeLists.txt — the master recipe. It downloads the two SDKs, sets up compiler flags and include paths, then pulls in every module subfolder. This is the folder you give to CMake.
new_module\Inverter2\CMakeLists.txt — the module’s own ingredient list, just a few lines naming the source files. It is not a standalone project; it only means something as part of the parent.
So in CMake:
Where is the source code:…\Documents\new_module — the parent folder.
Where to build the binaries: the same path plus \build.
Press Configure and accept the Visual Studio version it offers. The first run takes a minute or two while the SDKs download, and finishes with Configuring done.
Press Generate, then Open Project to launch Visual Studio.
Prefer the command line? From inside the new_module folder:
cmake -B build
cmake --build build --config Release
Seeing Unknown CMake command "gmpi_plugin"?
CMake Error at CMakeLists.txt:5 (gmpi_plugin):
Unknown CMake command "gmpi_plugin".
This is exactly what happens when CMake is pointed at the module’s subfolder (new_module\Inverter2) instead of the parent (new_module). The gmpi_plugin command is defined by the parent recipe, so the module’s file alone means nothing to CMake. Set Where is the source code to the parent folder, choose File → Delete Cache in cmake-gui (or delete the half-made build folder), and Configure again.
Visual Studio opens a solution named MyModules — your module plus two CMake housekeeping targets (ALL_BUILD, ZERO_CHECK) you can ignore. Build it (set the toolbar dropdown to Release, then Build Solution) and the compiled module appears at:
new_module\build\Inverter2\Release\Inverter2.gmpi
Copy that file into C:\Program Files\Common Files\SynthEdit\modules, restart SynthEdit, and your module shows up in the Insert menu under the category its XML declares. For a tighter loop, drop builds into the staging folder instead and SynthEdit hot-reloads them while it’s running — see The live-coding loop. Or tick SE_LOCAL_BUILD in CMake’s values list and re-Generate, and every build copies itself into the modules folder automatically (if Windows blocks the copy, run Visual Studio as administrator).
One skeleton, many modules: each Build Code Skeleton run adds a new subfolder, but the master CMakeLists.txt is written only once. When you add a second module, append a matching line at the bottom of new_module\CMakeLists.txt yourself — add_subdirectory("MyFilter") — and Configure again.
The fastest development cycle uses SynthEdit’s staging folder to pick up your latest build automatically. On Windows, add this as a post-build event to your Visual Studio project:
Now every successful build drops the fresh .sem into a directory SynthEdit watches. Close and reopen the project (or restart SynthEdit) and your changes are live. No installer, no manual copy, no version-bumping the module’s ID.
On Mac the equivalent is a cp step in the Xcode build phase, copying the .bundle into ~/Library/Application Support/SynthEdit/modules-staged/.
The shape of a simple processing module looks like this — pins declared as members, initialized in the constructor, then subProcess does the work:
class Gain : public MpBase {
public:
Gain(IMpUnknown*host);
voidsubProcess(intsampleFrames);
voidonSetPins() override;
private:
FloatInPin pinSignalIn;
FloatInPin pinGain;
FloatOutPin pinSignalOut;
};
Gain::Gain(IMpUnknown* host) : MpBase(host) {
initializePin(0, pinSignalIn);
initializePin(1, pinGain);
initializePin(2, pinSignalOut);
setSubProcess(&Gain::subProcess);
}
onSetPins() fires when a pin’s value changes — typically used to switch between processing variants or update internal state. subProcess() runs every audio block (typically 96 samples) and is where you actually multiply, filter, or oscillate.
The SDK repo’s examples/ folder has fuller versions of this pattern — a Gain, a Filter, a Wavetable Oscillator, an Envelope Generator — that you can copy and modify.
CPU matters in synths. The SDK has a built-in cooperative sleep system: a module marks its output as streaming or silent, and the host puts the whole module to sleep when its inputs are quiet. For modules with audio tails — reverbs, delays — this means zero CPU while the tail isn’t ringing.
bool active =pinSignalIn.isStreaming();
pinSignalOut.setStreaming(active);
setSleep(!active);
A reverb signals streaming = true while its tail is decaying, then false once the level drops below silence, and SynthEdit reclaims the CPU.
Pins connect a module to the rest of the patch; host services connect it to SynthEdit itself. Past the always-present basics — block size, sample rate — the host offers optional capabilities through small, independently-versioned interfaces. You ask for one by GUID: if the host supports it you get a pointer back, otherwise you get nothing and carry on. New services slot in this way without breaking existing modules or forcing a recompile.
The host arrives in your processor’s open(), and the base class keeps it in its host member. Request an extension with as<>(), which runs the GUID query and hands back a reference-counted pointer (or null):
#include"Extensions/ElapsedTime.h"
auto elapsedTime =host.as<synthedit::IElapsedTime>();
if (elapsedTime) {
int64_t samples =elapsedTime->getElapsedTime();
// ...
}
Always check the result before using it — not every host build implements every extension.
synthedit::IElapsedTime answers one question: how many samples has the engine rendered so far? getElapsedTime() returns that count as an int64_t, measured from when rendering began. Inside process() it reads as the sample position at the start of the current block — add your block offset if you need a finer position.
Two things make it more useful than a counter of your own. First, it survives sleep: when a module sleeps to save CPU and later wakes, the host resyncs its clock to the present, so a free-running LFO resumes at the correct phase instead of drifting by however long it dozed. Second, it stays in your module’s own sample-rate domain, so dividing by the host sample rate always yields elapsed seconds — even inside an oversampled container:
Reach for it when you need a monotonic, deterministic timeline: tempo-free timing, age-based modulation, or any effect whose state should follow absolute render position rather than the order events happen to arrive.
The recommended pattern is a parameter with an output pin on the DSP side and an input pin on the GUI side, both referencing the same parameterId in the XML. Write to the DSP-side pin like you would any output:
The GUI side gets a callback when the value arrives:
voidonValueInChanged() { // GUI side, UI thread
repaint();
}
This is how meters, scopes, and any “DSP-driven display” widget work. The framework throttles updates to ~60 Hz so you can’t accidentally swamp the GUI thread.
For unusual cases — large blobs, custom protocols — the SDK exposes a raw message pipe in both directions (sendMessageToAudio, receiveMessageFromGui). Use it sparingly; parameters are the right answer 95% of the time.
GUI modules draw with an API closely modelled on Microsoft Direct2D. The same drawing code compiles and runs on both Windows (native Direct2D) and Mac (an emulation layer that maps to Core Graphics) — so you write your widget once and it works on both platforms with no #ifdefs.
Color black(Color::Black);
auto brush =g.CreateSolidColorBrush(black);
g.DrawRectangle(Rect(0, 0, 10, 10), brush);
If you’ve used Direct2D directly, the API will feel familiar; if you haven’t, the example modules are a quick way in.
You don’t need to own a Mac to ship Mac builds. The recommended approach is Building modules with GitHub Actions: push a version tag and GitHub compiles your module on both Windows and macOS runners in the cloud for free, then publishes installers to a Release — no Mac, and no build server, required.
If you do have a Mac, the SDK’s Xcode workspace builds Universal Binaries (Intel + Apple Silicon) directly.
(An older approach used the Community Modules build service on Azure DevOps, which returns built .sem and .bundle artifacts from a CMake project; the GitHub Actions workflow above is now preferred.)
Modules you write with the SDK are yours. There are no royalties, no per-copy fees, no “powered by” requirements. You can:
Distribute your .sem files for free on the community forum or your own site.
Ship them inside commercial VST3 plugins built with SynthEdit.
Include them in commercial sample libraries, soundpacks, or kits.
The SDK’s BSD license also lets you fork it, modify the headers, and ship the modified SDK alongside your modules — useful if you need to extend the framework itself.
The SDK’s example modules — examples/ in the SynthEdit_SDK repo. Start by reading a small one (Gain), then a medium one (an oscillator), then a GUI module.
The mailing list — active community of module developers. Beginner questions are welcome; the people answering have shipped commercial plugins built on this SDK for over twenty years.
For ideas, the Music DSP archive is a goldmine of public-domain algorithms — many existing community modules started life as a Music DSP snippet pasted into a fresh SDK skeleton.