
Your First Synth
This tutorial walks you through the basics of SynthEdit by building a simple subtractive synthesiser from scratch. By the end you’ll have a patch that produces sound, lets you change the pitch and waveform with on-screen controls, and shapes the tone with a filter.
Along the way you’ll learn how to:
- Create a new SynthEdit project
- Find your way around the interface
- Add modules and connect them with patch cords
- Change parameters with controls and the properties panel
- Save your work
1. Modules, plugs, and patch cords
Section titled “1. Modules, plugs, and patch cords”A SynthEdit project is built from modules. A module can generate or process audio or MIDI, or it can be a control like a slider or knob. Some modules are even complete synthesisers.
Each module shows its plugs as coloured pin labels — inputs on the left, outputs on the right. You connect plugs together with patch cords to route signal between modules.
The colour of a plug indicates the kind of signal it carries (audio, MIDI, lists, etc.). SynthEdit will not let you connect plugs of incompatible types, so the wiring rules guide you as you work.
2. Start a new project
Section titled “2. Start a new project”A SynthEdit project holds all the modules, controls, and patch cords that make up your virtual synth.
- Launch SynthEdit
- Choose File → New from the menu
SynthEdit creates an empty document. The large work area is called the Structure View — it shows every module in your synth and how they’re wired together.
3. Add an oscillator
Section titled “3. Add an oscillator”The first thing every synthesiser needs is a sound source. We’ll add an Oscillator — a module that produces a continuous waveform.
- Right-click on an empty area of the Structure View and choose Insert → Waveform → Oscillator, or drag the module in from the Module Browser on the left.
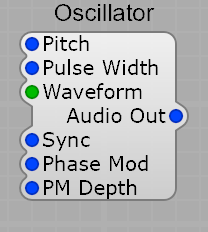
The oscillator has several plugs. The most important ones for now are:
- Pitch (input) — controls the frequency
- Waveform (input) — selects the shape of the wave (sine, saw, pulse, etc.)
- Audio Out (output) — the generated waveform
4. Add a sound out module
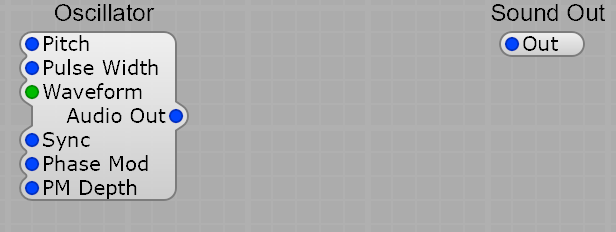
Section titled “4. Add a sound out module”The oscillator produces a waveform, but to actually hear it you need a Sound Out module — this routes audio from your patch to your speakers (or your DAW, when running as a VST).
- Choose Insert → Input/Output → Sound Out, or right-click and use the Insert menu.
- Drag the modules around by their title bars to lay them out neatly.
Tip: turn on Edit → Snap to Grid to keep things tidy.
5. Connect them with a patch cord
Section titled “5. Connect them with a patch cord”Now we’ll wire the oscillator’s audio into the sound out.
- Click the Audio Out plug on the Oscillator
- Move to the input plug on the Sound Out module and click again
A blue patch cord is drawn between them. The cord follows the modules if you drag them around.
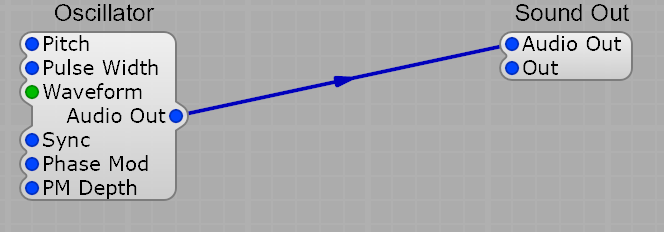
As you drag a cord across plugs, SynthEdit highlights the ones it can legally connect to. It will refuse to connect two inputs together or two outputs together. The Sound Out module also automatically grows a new spare input pin once you’ve wired one — handy when you want to mix several sources together.
6. Play the sound
Section titled “6. Play the sound”You now have the minimum needed to make some noise.
Warning — the oscillator produces a constant, fairly loud waveform. Turn your speakers down before pressing play.
- Press the Play button on the toolbar (or hit Spacebar) to start audio
- Press Stop (or Spacebar again) to stop
It’s not exactly inspiring yet — just a continuous tone — but it’s a start. The oscillator is producing a fixed waveform and pumping it straight into Sound Out.
This is a good moment to save: choose File → Save and name the file tutorial.synthedit.
7. Add a control for pitch
Section titled “7. Add a control for pitch”To change the oscillator’s pitch while it plays, we need a control module. Sliders are the most common choice.
- Right-click just to the left of the oscillator and choose Insert → Controls → Slider
- Connect the slider’s Signal Out plug to the oscillator’s Pitch input

- Press Play (or Spacebar)
- Click the slider’s knob and drag it up and down while the sound plays
The pitch follows the slider in real time. Most module parameters in SynthEdit can be controlled this way — just route a control’s output to the parameter’s input plug.
8. Module parameters: three ways to set them
Section titled “8. Module parameters: three ways to set them”What you just did is one of three ways to set a module’s parameters:
- Use a control module — like the slider you just added. Best for parameters you want to change while the synth plays (pitch, cutoff, volume, etc.).
- Use the module’s properties panel — best for parameters that stay fixed (the module’s name, default values, etc.).
- Drive it from another module’s output — for example, an envelope’s output can be wired to a filter’s cutoff so that the envelope shapes the tone over time.
Let’s try the second one.
9. Use the properties panel
Section titled “9. Use the properties panel”- Click the Oscillator to select it. Its properties appear in the panel on the right (or right-click and choose Properties if it’s hidden).
- Find the Waveform property and change it from Saw to Pulse
- Optionally, change the module’s Title to
OSC1so it’s easier to identify
Press Spacebar to play. The oscillator now produces a pulse wave, which has a more hollow, reedy character than a sawtooth. Try the other waveforms to hear the difference.
10. Add a List Entry control for the waveform
Section titled “10. Add a List Entry control for the waveform”Setting the waveform from the properties panel is fine for a fixed value, but it would be nicer to switch waveforms while the synth plays. A List Entry module gives you a drop-down menu on the panel.
- Insert a List Entry module: Insert → Controls → List Entry
- Connect the list entry’s Value Out output to the oscillator’s Waveform input
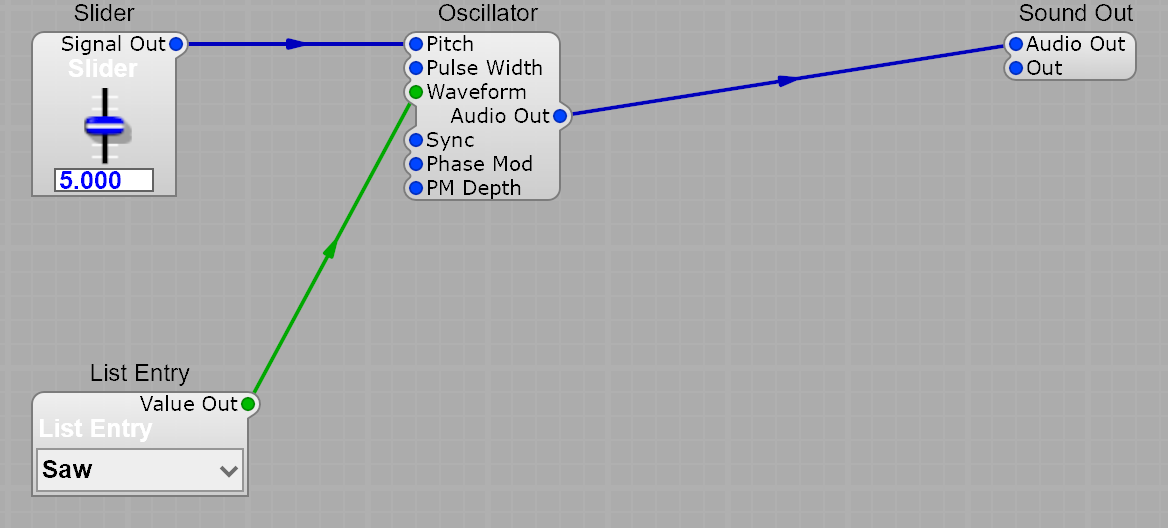
You can now pick the waveform from a drop-down. If the module is too small, drag its bottom-right corner to resize it.
Notice that the new patch cord is green, not blue. SynthEdit uses different colours for different signal types — green is for list (enum) choices, blue is for audio. SynthEdit won’t let you connect mismatched types, which catches a lot of mistakes early.
11. Add a filter
Section titled “11. Add a filter”The oscillator on its own is a bit raw. A filter sits between the oscillator and the sound out, shaping the tone by removing or emphasising certain frequencies.
- Click the patch cord between the oscillator and sound out, and press Delete to remove it
- Insert an SV Filter: Insert → Filters → SV Filter
- Wire the oscillator’s Audio Out → filter’s Signal input
- Wire the filter’s Low Pass output → Sound Out’s input
- Add a second slider and wire it to the filter’s Pitch input so you can sweep the cutoff

Press Play and experiment. As you move the cutoff slider, the filter sweeps through the harmonic content of the oscillator — that classic synthesiser sound. Try different waveforms with the list entry too.
Save your work again before moving on.
Summary
Section titled “Summary”Congratulations — you’ve just built your first software synthesiser! This patch is a textbook example of subtractive synthesis: start with a harmonically rich waveform and use a filter to carve away frequencies.
You now know how to:
- Create a new project and find your way around the Structure View
- Add modules and connect them with patch cords
- Set parameters from the properties panel
- Drive parameters in real time with control modules
- Use different signal types (audio vs. lists) and let SynthEdit’s colour-coding guide your wiring
Next steps
Section titled “Next steps”- Read Working with Modules for more on inserting, connecting, and configuring modules
- Learn about Signal Types & Levels to understand SynthEdit’s voltage conventions
- Add an envelope generator so the filter sweep happens automatically with each note
- When you’re ready to play your synth from a MIDI keyboard, see MIDI Automation
- Once it sounds the way you want, export it as a VST plugin